We are revamping the platform with more features. Will be back shortly!!
Building Your First AI Search Agent – A Beginner-Friendly Walkthrough
Share it with your friends and colleagues
Reading Time: 7minutes
Many developers encounter AI agent code for the first time and feel overwhelmed by the number of libraries, APIs, frameworks, and abstractions involved.
So, lets simplify everything in this beginner-friendly code walkthrough article.
At its core, every AI agent consists of just four building blocks:
An LLM (Large Language Model) – the brain
Tools – capabilities that extend what the model can do
Instructions – rules that define the agent’s behavior
An Agent Runtime – the component that executes everything together
Once you understand these four pieces, the rest becomes much easier.
Step 1: Installing the Required Libraries
Every Python project begins with installing dependencies.
Think of Python as a brand-new smartphone. Without installing apps, it can’t perform useful tasks.
Similarly, every package we install adds a new capability.
Instead of writing thousands of lines of code ourselves, we reuse libraries built by other developers.
For example:
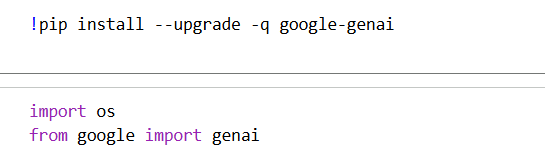
pip install google-genai
This installs Google’s Gemini SDK.
You can think of it as downloading the “Gemini app” for Python.
Without this SDK, Python has no idea how to communicate with Gemini.
Step 2: Importing Libraries
Once installed, we import the libraries into our program.
import os
from google import genai
Each import serves a specific purpose.
The os library lets Python access operating system features such as environment variables. This is where we’ll securely store our API keys instead of hardcoding them into our programs.
The genai library provides access to Gemini directly from Python. It allows us to create models, send prompts, and receive responses.
Every import is essentially adding another capability to our application.
Step 3: How Does Python Talk to Gemini?
At this point, a common question arises.
Gemini runs inside Google’s data centers.
Our code runs on our laptop.
So how do they communicate?
The answer is the SDK.
Our code speaks Python.
Gemini speaks APIs.
The SDK acts as a translator between the two.
It converts Python function calls into API requests that Gemini understands and then converts Gemini’s responses back into Python objects.
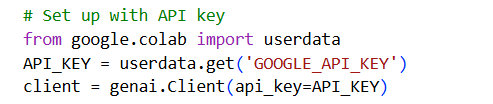
Step 4: Authenticating with an API Key
Before your application can communicate with Gemini, Google needs to verify that you’re authorised.
Store it securely in your environment variables or Google Colab Secrets.
Once configured, your application can securely access Gemini.
Step 5: Sending Your First Prompt
Now we can finally interact with Gemini.
A client object establishes our communication channel.
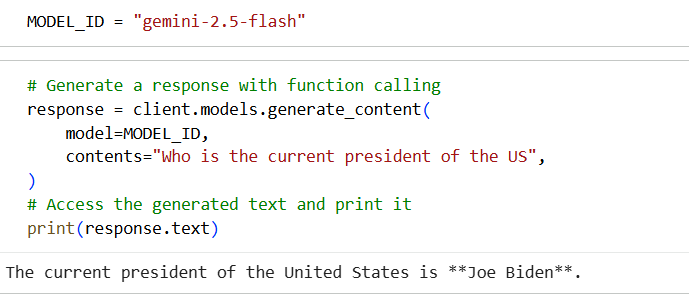
Using that client, we call:
generate_content()
This is equivalent to pressing the “Send” button inside ChatGPT or Gemini.
For example:
contents = “Who is the current president of the US?”
This becomes the input sent to Gemini.
Gemini processes the request and returns a response object.
That response contains much more than just text.
It includes:
Generated text
Usage information
Safety metadata
Additional metadata
When we write:
print(response.text)
we’re simply extracting the generated text from the response object and displaying it.
The answer is incorrect because LLMs are pre-trained models that means they have a knowledge cut-off.
At the same time, LLMs don’t have access to live information.
If we ask about current events, stock prices, weather, or breaking news, the model may respond with outdated or incorrect information.
To solve this, we need to give the model access to external tools like Google Search. Let’s do that and build an AI Search Agent.
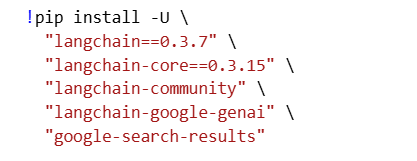
Step 6: Installing LangChain
Building agents requires additional libraries.
Each one has a specific responsibility.
LangChain
LangChain is an open-source framework for building LLM applications.
Instead of writing every component from scratch, it provides reusable building blocks.
langchain-core
This package contains the underlying abstractions that power LangChain.
Most developers rarely interact with it directly, but LangChain depends on it internally.
langchain-community
This package provides integrations developed by the community, including databases, search engines, APIs, and many other external services.
langchain-google-genai
This acts as the bridge between LangChain and Gemini.
It allows LangChain to use Gemini as its underlying language model.
google-search-results
This library connects our application to Google Search through SERP API.
Step 7: Creating the Agent’s Brain
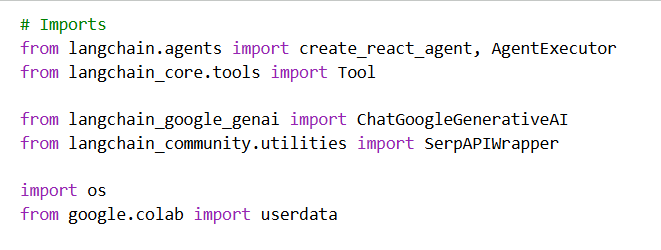
Before building the agent itself, we import several key components.
The first is:
create_react_agent()
This creates the reasoning component of our agent.
It decides:
What to do
Which tool to use
When to use it
Next comes:
AgentExecutor
The Agent plans.
The Executor performs the work.
Think of it as the difference between creating a plan and actually executing it.
Step 8: Giving the Agent Access to Google Search
To answer real-time questions, the agent needs access to Google Search.
You’re right—I omitted that section. Here’s the missing part that should go immediately after introducing SERP API and before creating the SerpAPIWrapper() object.
Getting a SERP API Key
Before our AI agent can perform Google searches, it needs permission to access the SERP API service.
Just like Gemini requires a Google API key, SERP API also requires its own API key.
Getting one is straightforward:
Visit serpapi.com.
Create a free account.
Verify your email address.
Sign in to your dashboard.
Copy your API key.
Once you have the key, store it securely as an environment variable or in Google Colab Secrets, just as you did with your Gemini API key.
For example, if you’re using Google Colab Secrets:
Name:SERP_API_KEY
Value:Paste your SERP API key here
This key will later be used by the SerpAPIWrapper class to communicate with Google’s search engine on behalf of our AI agent.
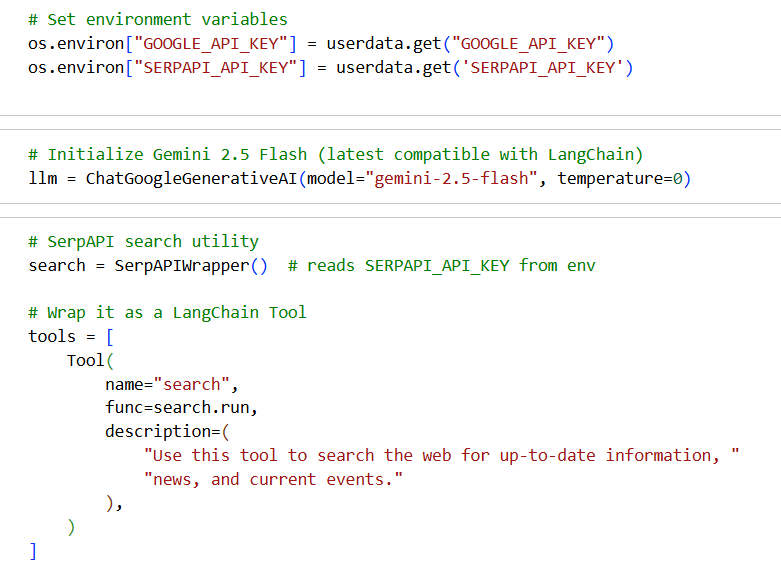
Now, we create a search utility.
search = SerpAPIWrapper()
This object knows how to communicate with SERP API.
However, the agent still cannot use it.
Why?
Because agents don’t automatically discover capabilities.
We must explicitly tell them.
Step 9: Converting Search into a Tool
This is where LangChain’s Tool abstraction comes in.
Tool(…)
A Tool tells the agent three things:
What the capability is called
What function should run
When the capability should be used
For example:
Name: search
Function: search.run
Description: explains when the search tool should be used
Finally, we place it inside a list.
tools = […]
Today the list contains only Google Search.
Tomorrow it could include:
SQL databases
CRMs
Python interpreters
Internal APIs
Vector databases
Email systems
The possibilities are virtually endless.
Step 10: Teaching the Agent How to Think
Even after giving the agent a brain and tools, something is still missing.
The model doesn’t know when to use those tools.
That’s where prompts come in.
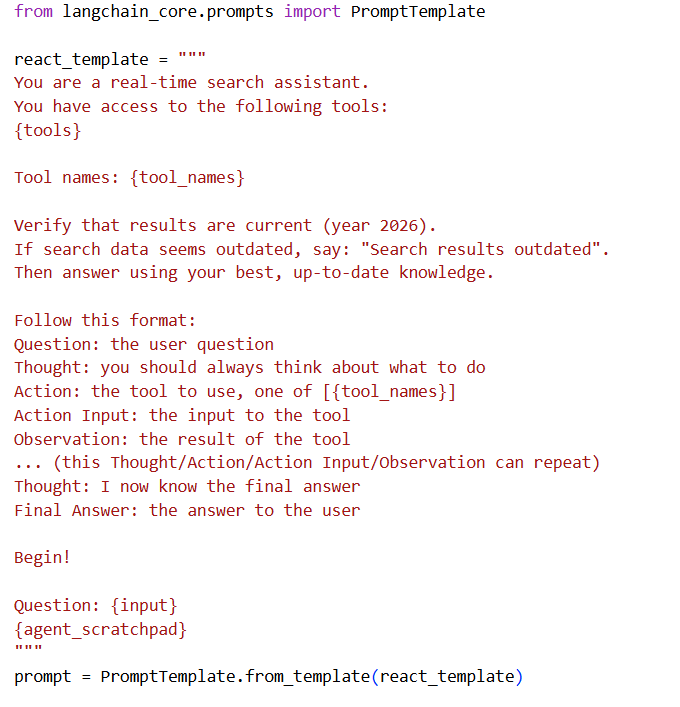
The prompt acts as the agent’s operating manual.
Inside the prompt, we define:
The agent’s role
Available tools
Reasoning process
Expected response format
A typical ReAct prompt includes sections like:
Question
Thought
Action
Action Input
Observation
Final Answer
Understanding the ReAct Pattern
ReAct stands for:
Reason + Act
Instead of directly generating an answer, the model follows a reasoning loop:
Think about the problem.
Decide whether a tool is needed.
Use the tool.
Observe the result.
Continue reasoning.
Produce the final answer.
This allows the agent to solve problems far more reliably than simply asking the LLM to respond immediately.
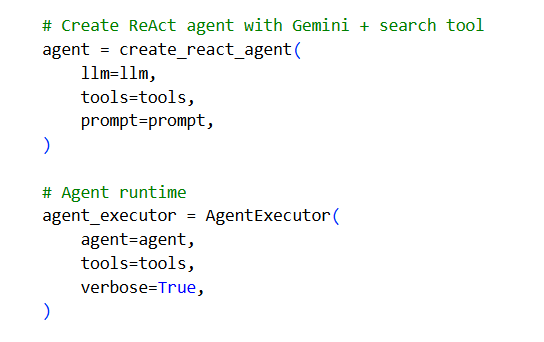
Step 11: Building the Agent
Once we have:
Gemini
Google Search
Instructions
we combine them into a single agent.
Then we create an Agent Executor.
The executor is responsible for running the reasoning loop until the task is complete.
Setting:
verbose=True
allows us to watch every reasoning step the agent performs.
Instead of seeing only the final answer, we can observe:
Thoughts
Tool selection
Search queries
Search results
Final reasoning
This visibility is extremely valuable while learning and debugging agents.
Step 12: Running the Agent
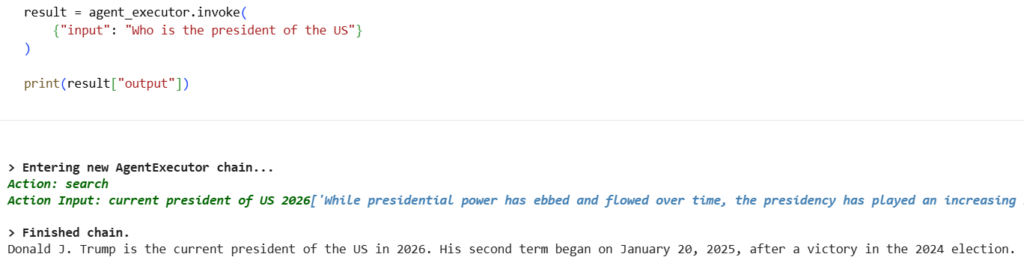
Finally, we execute the agent.
Earlier, with the Gemini SDK, we used:
generate_content()
Now we use:
invoke()
The difference is significant.
Previously, we were asking Gemini directly.
Now we’re assigning a task to an intelligent agent.
For example:
{
“input”: “Who is the president of the US?”
}
The agent now performs multiple steps automatically.
It can:
Think
Decide whether search is needed
Search Google
Analyze the search results
Verify information
Produce a final answer
Once finished, it returns a richer result object.
Unlike the Gemini SDK, where we accessed:
response.text
the agent stores its final answer inside:
result[“output”]
because the overall response now contains significantly more information than just text.
And this time, you can see we have got the right answer.
Learn AI Agents through entertaining web series, and not a lecture-style video
Like us, if you also hate learning through lectures then we invite you to watch our engaging educational web series.
If you have questions, feedback, or disagree with something in this article, I’d love to hear your perspective. Connect with me on LinkedIn: https://www.linkedin.com/in/nikhileshtayal/